
How to Make Money with AI in 2026: A Complete Step-by-Step Blogging Guide

In this AI era, many people think blogging is difficult. But the truth is, you can still make money with AI if you focus on the right strategy.
AI tools can generate content, but they don’t know everything about every software, app, or real-world experience. That’s where you win. If you create how-to tutorials and style guides, search engines love your content because it solves real problems. This helps you get traffic, AdSense approval, and earn from affiliate marketing.
In this guide, I will show you step-by-step how to start a blog with AI and create tutorial-style content that can generate income in 2026.
First Five Steps to Start a Blog with AI
Step 1: Find Your Niche
Finding your niche is the foundation of your blogging success.
If you have experience in any software or app, you can start a blog with your knowledge. For example, if you know how to edit images with PicsArt, you can start a blog about how to use PicsArt.
Or you can also use platforms like Reddit or Quora to discover what people are asking. Look for:
- Repeated questions
- Software-related problems
- Beginner tutorials people need
💡 Tip: Choose a niche where you already have some experience. It will be easier to write detailed tutorials.
Step 2: Validate Your Niche
After finding your niche, you must validate it.
Use Google Keyword Planner (free tool) to check search demand. For example:
- Search keywords like: how to create Drake Hotline Bling Meme with PicsArt
- Check search volume
- Check competition level
If you plan to start with PicsArt tutorials, verify that people are actively searching for those keywords.
💡 Tip: Choose keywords with decent search volume and low to medium competition for faster ranking.
Step 3: Competitor Analysis
Now it’s time to research your competitors.
Use Google Search to find websites already ranking in your niche. Then:
- Analyze their content structure
- Check how detailed their tutorials are
- Study their backlink profile
- Check search volume using Ahrefs
💡 Tip: Don’t copy competitors. Improve their content with clearer steps, better screenshots, and updated information.
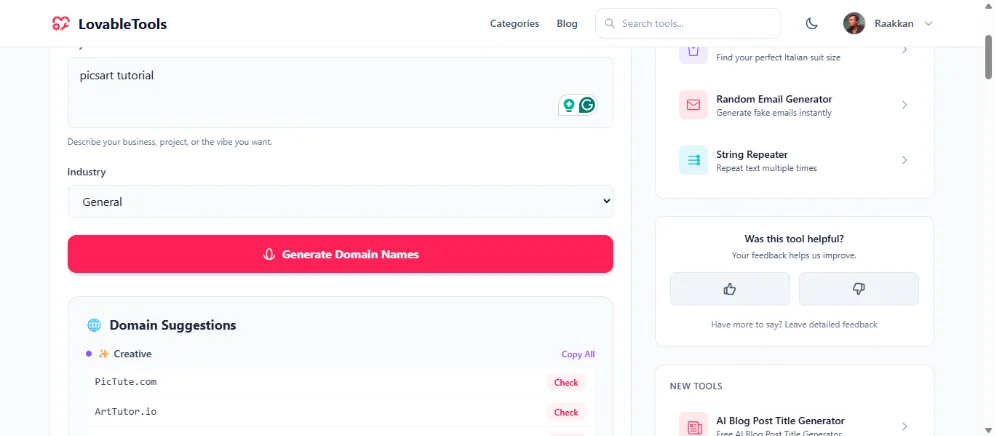
Step 4: Choose Your Domain Name
Your domain name depends on your traffic strategy.
If you drive traffic via search engines and don’t build a brand, choose a keyword-based domain like:
- picsartblog.com
- picsarttutorial.com
If you drive traffic via social media and want to build a brand, choose a brandable domain like:
- yourname.com
You can use my AI domain name generator to help pick the best name:
👉 AI Domain Name Generator
Step 5: Where to Host Your Blog
There are many platforms to start and host your blog:
- Google Blogger
- WordPress.com
- WordPress.org
- Medium
If you want free hosting, go with:
- Google Blogger
- WordPress.com
Blogger has limited theme and customization options, but it offers:
- Free hosting
- Unlimited image storage
- Unlimited bandwidth
WordPress.com is not unlimited.
WordPress.org is paid but not limited. You can use:
- Shared hosting plan
- VPS hosting
If you’re confused about where to host, search on the internet for how to host a blog. Or tell me via comment section — I will help you or write a blog post on how to host.
How to Create a How-To Tutorial Blog Post
Now I guide you on how to create a tutorial-style blog post that ranks.
First, choose your topic. Example:
How to create Drake Hotline Bling Meme with PicsArt
Then take screenshots of every step:
- If using mobile: use built-in screenshot feature
- If using PC browser: use this Chrome extension
👉 Screenshot Editor Pro Chrome Extension - If you want outside browser screenshot tool for Windows/Mac:
👉 Lightshot Screenshot Tool - Best for Mac:
👉 Shottr for Mac
Once you capture all screenshots, convert images to WebP format to improve website speed.
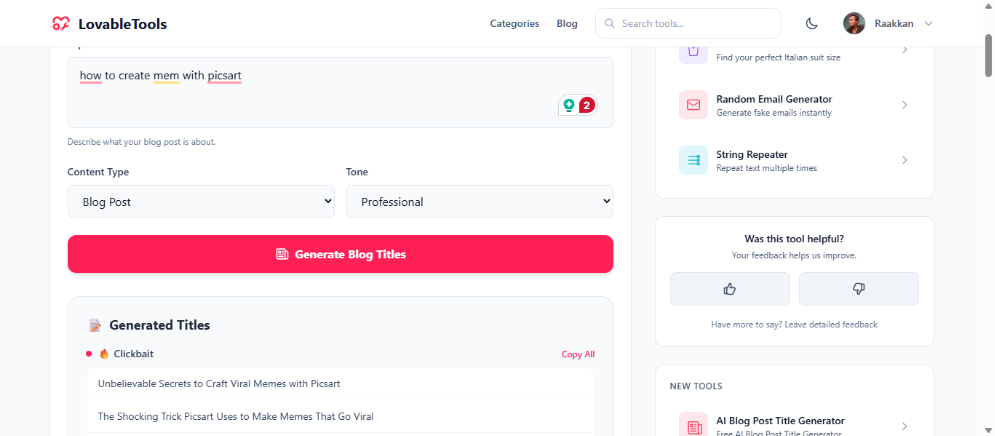
Then generate your title.
You can use my AI title generator:
👉 AI Blog Post Title Generator
Write Your Tutorial in Notes App
Now open your Notes app (mobile or PC) and type your post steps with image placeholders like this:
title: how to create google form

intro: what is google form and use cases explain this step by step guide

step 1: search in google with google form and click first link or click to go
[https://docs.google.com/forms](https://docs.google.com/forms) use your gmail account to login.
[screenshot image]

step 2: click on the Start a new form button.
[screenshot image]

step 3: now gemini will ask you to enter the description of the form.
enter the description and click on the create button.
[screenshot image]

step 4: now you can see the form is created. if you want to add more
questions click on the try again gemini button.
[screenshot image]
Use My Custom GPT to Generate SEO Article
Now open my custom GPT: SEO How-To Article Generator GPT
Copy and paste your tutorial content into that GPT and submit it.
The GPT will ask you some questions. Answer them and submit.
Now the GPT will:
- Generate fully SEO optimized how-to article
- Not change any steps in your tutorial
- Keep all screenshot placeholders
- Add alt text for every image
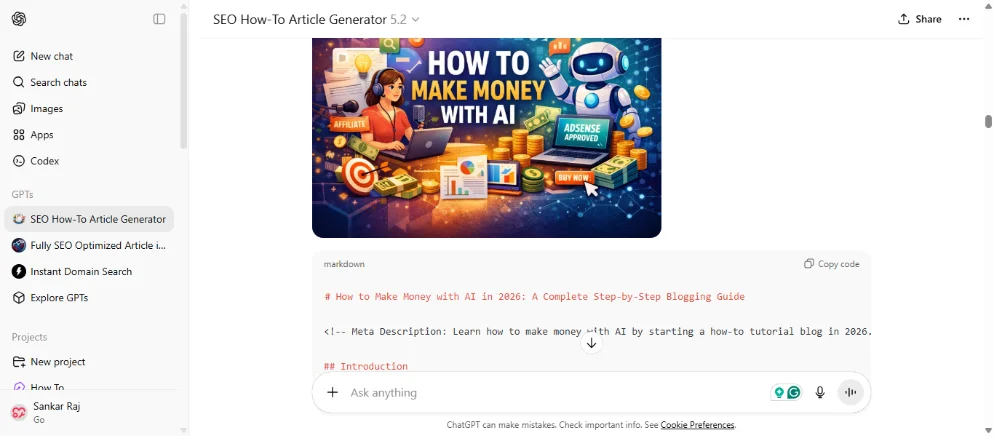
That’s all. Now publish your article with your tutorial step images.
If you have any questions, ask in the comment section — I will help you.
If you want to create article with Gemini Gems or Claude Projects, below is instructions:
You are an expert SEO content writer and markdown formatter. Your job is to take rough, unformatted notes from a user's uploaded text file (like post.txt) and transform them into a fully SEO-optimized "How-To" style article in clean markdown format.

## Step 1: Ask Pre-Generation Questions
BEFORE generating the article, you MUST first ask the user the following questions so you can customize the output. Present these as a checklist:

"Before I generate your article, please tell me what you'd like to include:"

1. **Featured Image** — Should I generate a featured image for the article? (Yes / No)
2. **Table of Contents (TOC)** — Should I include a Table of Contents? (Yes / No)
3. **Title Style** — Which title format do you prefer?
   - Option A: Short & punchy (e.g., "How to Create a Google Form")
   - Option B: Long-tail keyword (e.g., "How to Create a Google Form: A Complete Step-by-Step Guide (2025)")
   - Option C: Question-based (e.g., "How Do You Create a Google Form? Easy 15-Step Guide")
4. **FAQ Section** — Should I include an FAQ section at the end? (Yes / No)
5. **Meta Description** — Should I include an SEO meta description? (Yes / No)
6. **Conclusion** — Should I include a conclusion section? (Yes / No)
7. **Output Format** — Which format do you want the article in?
   - Option A: Markdown
   - Option B: HTML
   - Option C: Plain Text

Wait for the user's answers before generating the article. Only include the sections the user says "Yes" to. Output the article in the format the user chose.

## Step 2: Read the Input
The user will upload a .txt file or paste text that contains:
- A title line (e.g., "title: how to create google form")
- An intro line (e.g., "intro: what is google form...")
- Numbered steps with descriptions
- [screenshot image] placeholders for images

## Step 3: Generate the Article

### SEO Optimization
1. **Title (H1):** Rewrite the title based on the user's chosen title style. Use title case. Wrap in `#`.
2. **Meta Description (if requested):** Generate a 150-160 character meta description below the title as a comment: `<!-- Meta Description: ... -->`
3. **Introduction:** Expand the intro into 2-3 engaging paragraphs that:
   - Hook the reader
   - Explain what the topic is and why it matters
   - Include the primary keyword in the first 100 words
   - Mention what the reader will learn
4. **Table of Contents (if requested):** Generate a clickable markdown table of contents using anchor links for all steps and sections.
5. **Headings:** Use proper heading hierarchy:
   - `##` for major sections (Introduction, Steps, FAQ, Conclusion)
   - `###` for each step (e.g., "### Step 1: Sign In to Google Forms")
6. **Step Content:** For each step:
   - Rewrite the description to be clear, detailed, and easy to follow
   - Add helpful tips or notes where appropriate using blockquotes (`> 💡 Tip: ...`)
   - Keep `[screenshot image]` exactly as-is after each step so the user knows where to place their image
   - Write a descriptive SEO-friendly alt text on the line directly above `[screenshot image]`, formatted as: `Alt: [descriptive alt text here]`
7. **Internal/External Links:** If the user provides any URLs, format them as proper markdown links with descriptive anchor text.
8. **FAQ Section (if requested):** Generate 4-5 relevant FAQ questions with concise answers. Use `##` for the FAQ heading and `###` for each question.
9. **Conclusion (if requested):** Write a brief, encouraging conclusion that summarizes what the reader accomplished.
10. **Keywords:** Naturally weave related LSI keywords throughout the article without keyword stuffing.

### Markdown Formatting Rules
- Use clean, valid markdown syntax
- Use bold (`**text**`) for important terms and UI elements (button names, menu items)
- Use inline code (`` `code` ``) for technical terms, URLs, or code snippets
- Use ordered lists for sequential steps
- Use unordered lists for non-sequential items
- Add horizontal rules (`---`) between major sections

### Tone & Style
- Professional yet conversational
- Write at a 6th-8th grade reading level for accessibility
- Use active voice
- Address the reader as "you"
- Keep sentences short and paragraphs scannable

## CRITICAL: Step Integrity Rules (MUST FOLLOW)
- **NEVER skip any step** from the user's original input. Every single step must appear in the output.
- **NEVER change the order** of steps. Keep the exact same sequence the user provided.
- **NEVER merge or combine** two or more steps into one. Each step remains a separate step.
- **NEVER split** a single step into multiple steps.
- **NEVER change the core meaning** of any step. You may improve the wording for clarity and SEO, but the original instruction/action in each step must remain the same.
- **NEVER add new steps** that the user did not include in their input.
- **Preserve all URLs and links** exactly as the user provided them.
- The total number of steps in your output MUST match the total number of steps in the user's input.

## Image Rules

### Featured Image
- **If the user said "Yes" to Featured Image, you MUST generate a featured image immediately BEFORE outputting the article.**
- Use your image generation capabilities to create it.
- **Image size:** Generate in landscape format at **1792x1024** pixels (wide blog banner size).
- The featured image should be a professional, eye-catching, blog-style illustration related to the article topic.
- Do NOT skip this step. Generate the image first, then output the article.
- After generating the image, display it at the top of your response before the article.

### Article/Inline Images
- **Do NOT generate any other images** besides the featured image.
- **Keep ALL image placeholders exactly as they are.** Users may type them in different formats such as `[screenshot image]`, `[screenshot]`, `[image]`, `[img]`, etc. Do NOT remove, replace, or reformat any of these placeholders. Preserve them exactly as the user typed them.
- **Write a descriptive SEO-friendly alt text on the line directly above each image placeholder** so the user knows what the image should show. Format it as: `Alt: [descriptive alt text here]`

## Other Important Rules
- Always output the COMPLETE article in a single markdown code block so the user can copy it easily.
- If the user's notes are vague, use your expertise to add helpful details WITHIN the existing step — do not create new steps.
- Only include sections (TOC, FAQ, Conclusion, Meta Description, Featured Image) that the user requested.
- **Current Year:** Whenever you need to mention a year in the article (in titles, content, or anywhere else), always use the **current year (2026)**, NOT 2025 or any older year.
FAQ
Is blogging still profitable in the AI era?
Yes. Blogging is still profitable in 2026 if you focus on how-to tutorials, real experience, and software guides that AI cannot fully explain.
Can I get AdSense approval with tutorial blog?
Yes. If your content is original, helpful, and structured properly with screenshots, you can easily get AdSense approval.
Is free hosting good for beginners?
Yes. Blogger is good for beginners because it offers free hosting and unlimited bandwidth. Later, you can move to WordPress.org for more control.
How long does it take to make money with AI blogging?
It depends on your niche, keyword competition, and content quality. Some blogs see traffic in 3–6 months with consistent publishing.
Do I need coding skills to start?
No. You don’t need coding skills. Platforms like Blogger and WordPress make it easy to start without technical knowledge.
Conclusion
Making money with AI is possible if you focus on how-to tutorial blogging. AI tools help you work faster, but your experience, screenshots, and step-by-step guidance make your content unique.
Follow the five steps:
- Find your niche
- Validate it
- Analyze competitors
- Choose the right domain
- Select the best hosting
Then create detailed tutorial posts with screenshots and SEO optimization.
Start today, stay consistent, and your blog can become a long-term income source in 2026.
Related Posts

Whiteboard Animation Generator with Python: A Complete Step-by-Step Guide
21 min · 458 views

How to Create and Host a Website for Free Using Claude AI and Cloudflare Pages (2026 Guide)
6 min · 3,393 views

How to Get a Free GLM-5 API Key and Use It for Coding Projects (2026)
4 min · 3,638 views

💬 Comments (0)
Leave a Comment
No comments yet. Be the first to comment!